
A fridge provides with heat, rain and predators protection, has a very convenient size and allows an easy way to monitor worm bedding and worm monitoring.
Finding an old fridge

remove all equipment and keep only the fridge body, laying down on its back.

Identifying the hole at the back of the fridge. This will be used as the out flow for worm tea. The fridge should be leveled in a way that the outflow is the lowest part of the body with maybe a slight inclination of the fridge, to ease the liquid evacuation.

The photo shows the tube of evacuation

The body and the tap must be high enough to allow enough space for a bucket underneath. The liquid waste (worm tea) forms the leachate. This organic manure is a liquid fertilizer rich in nutrients. Dilute with water to 1/10 before giving plants. To prevent the worm tea becoming anaerobic in the drainage layer verse pure water from time to time on the drainage layer through the air filter (see photos below to identify this filter). Then harvest the blend in a bucket. This will dilute the tea and clean the drainage layer.

The outflow is filtered by a recycled shower head.

A layer of gravels is used for drainage (about 3/4 cm or 1 inch thick) and reduce contact between the organic layer (worm bed) and the water.
This layer will reduce anaerobic decomposition on the bottom of the farm.

Structure of aluminum for supporting the filter of separation between the drainage and worm bed layers. Wood would decompose and iron would degrade rapidly in this humid environment. The structure is not mandatory and the filter can be laid down directly on the drainage layer. In this case the filter should enroll entirely the gravel layer in order to ensure that the filter will stick to the walls of the fridge. Here the structure has internal reinforcement to avoid its sides to bend and let open the filter for worms to end up in the drainage layer. The alternative solutions found on internet use staples to fix the filter to the fridge body. This solution is not Cradle to Cradle (irreversible) preventing a proper maintenance of the drainage layer.

The sheet is doubled or tripled to prevent baby worms to go through.

and installed on top of the drainage layer.

The door insulation rubber is remove to allow ventilation (worms need to breath oxygen)

The rubber is cut in pieces

And the inside magnet (used to ensure magnetic closure of the fridge door) removed.

The rubber pieces are then used to fill the holes in between the filter structure and the fridge body.

A ventilation funnel is made of various tubes.

and positioned on the top of the drainage layer.

Coconut fibers are used as a guaranty for humidity conservation. Furthermore the fiber allows oxygenation, habitat for the worms and the numerous microorganisms which will develop in the worm bed.

If you use cardboard (preferred to white paper chemically treated) make sure they have been soaking into water for day.

Since it is always a matter of risk management and experimentation separate the farm body in 3 compartments which will receive different type of worm bed, giving the possibility to the worms to find their best environment. Later these 3 compartments can have different functions like one for food , another one for collecting the casting, another one for testing different nutrients, e.g. possible toxic leaves from the garden where tropical organic matter is sometime aggressive.

This compartment receives chicken manure.

This one semi composted leaves.
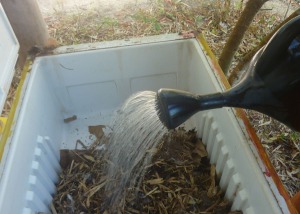
All 3 compartments are generously watered. The watering depend mainly on your climate (ambient humidity). Over time you’ll know how to manage the worm farm humidity depending on where are migrating the worms. If the go on the bottom it means they are looking for humidity then add water. If they go on the top it means they look for aerobic conditions, meaning that you have to remove humidity either by removing soaking material of by adding dry organic matter.

You are ready to start , letting the worms acclimatized in the middle compartment with neutral context. Over time add green stuff, not aggressive. Avoid acidity, onions, animal proteins, fat. Make sure that hot composting does not start inside the farm by not creating too dense pile of very humid organic / green material. Time to time you can add some egg shells to compensate acidity. Purist will clean then before, to avoid attracting pest.

We will try this in Genesis Community Garden Bronx GCGB. Do you have other DIY suggestions for PermaCulture with Zero Budget?
LikeLike
Hello Jor, every function described in this website is low budget, low impact, low Tech and smart design (at least intended to be), mainly using recycling and local resources. The philosophy is: “design completion is obtained when everything not necessary is removed” and “conception includes the capability to disassemble and reuse” which are the best ways to reduce material consumption.
LikeLike